
This recipe is a bit of a ‘throw back’ (ugh, yuck), because I made it while in New Zealand about a month ago but found myself unable to take it from ‘bread I made’ to ‘bread I could write about’. Partly I felt a bit guilty that I had made three breads from Honey & Co (a book I owned in Melbourne) while I was home (the other two, for the record, were Bukhari Bread and Milk Bun Challah) and partly because I thought I hadn’t really captured the process all that well and partly because it just sort of worked out quite easily and lacked the drama and angst I thrive on.
Pita bread is very special to me. For most people it probably features as a middle eastern accompaniment to dips, or as a doughy vehicle for falafel. For me it represents breakfast for most of my school years. I don’t know how I discovered that frozen supermarket pita bread was one of my favourite things in the world, or how I determined that, once heated up, it was equally delicious with peanut butter and without any accompaniment at all. I do know that I breezed through a 5 pack each week with delight.

This bread wasn’t made as a breakfast treat, because even my loving family would have raised their eyebrows at that. Also you have to get up early if you want bread for breakfast and no thank you. Instead I ‘whipped it up’ in true baking goddess fashion as an accompaniment to a vegetarian moussaka. Yes, I made that also (another Honey & Co success story). Yes, I realise there is nothing about pita bread and moussaka that inherently goes together and no, I don’t care.

You wouldn’t have cared either – both the pita bread and the moussaka were extremely delicious, if somewhat unphotogenic. I would have them again – together or separately.

The pita itself was pretty straight forward to make. The most intense and involved bit was the baking where you have to transfer the raw dough onto a super hot tray and then get yourself out of there stat so that the dough can cook. The recipe recommended doing this with a bread paddle (a what?) or a wide metal spatula and then somehow flicking the pita off the spatula and onto the tray. I couldn’t manage this so I used my hands…much more dangerous, but it worked better for me.

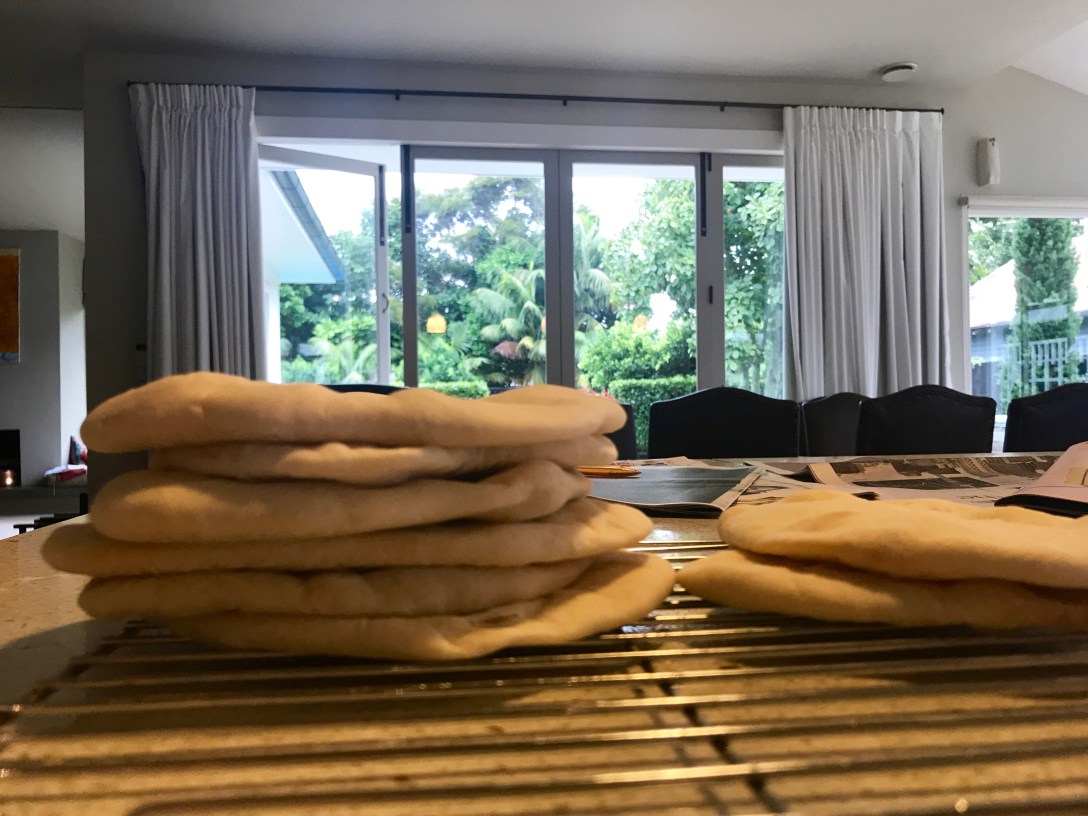
Of the 10 breads that I made 7 turned out like dreams and 3 got a bit folded over and didn’t puff up quite right. They still tasted delicious, they just weren’t functional in a traditional pita pocket sense. 70% success rate on my first outing is just good enough to keep me coming back for more – I will absolutely make these again. Maybe I will even learn how to do the special spatula flicking trick? It’s more likely I’ll burn myself.
Pita Bread
Reproduced with love from Honey & Co
INGREDIENTS
500g strong white flour (high protein bread flour), plus extra for dusting
1 tsp sugar (plus a pinch if using dried yeast)
1½ tsp salt
20g fresh yeast or 2 tsp dried yeast (fresh, as we all know by now, is supposed to be better)
300-400ml warm water
2 tbsp olive oil
METHOD
Mix the dough
If you have a mixer with a dough attachment, use it. Otherwise a large bowl will be fine. Mix together the flour, sugar and salt. If you have the all mighty fresh yeast then crumble it straight into your flour and mix to combine. If you are using dried yeast then place it in a cup and add 100ml of the warm water and the extra pinch of sugar. Mix with the tip of your finger and leave it to sit until a foam forms on the top, then pour it over the flour.
Start adding the warm water to the flour/yeast mixture. Add a little at a time, mixing in circular motions until the dough starts to clump together (do this with a spoon or by hand even if you’re using a mixer for the next bit). Give the dough a good mix an see if it will form a ball – if there’s still a bit of flour in the bottom of the bowl add a touch more water. You want the dough to just come together and don’t worry about a few lumps.
BY HAND – use a clean flat surface (try not add any flour) and throw the dough around a bit, then smooth it out, then repeat. You are working to get a dough that’s smooth and tight.
BY MACHINE – turn onto a medium speed and let it go until the dough looks smooth and tight.
BOTH – add the oil and knead to combine. It’s super slippery and it takes a while for everything to come together, but it does. The final texture is silky smooth.
Rest and prep
Cover the bowl with cling film. If you are baking the pita the next day then leave the dough in the fridge overnight (just make sure there’s a nice big container that’s 3 times the size of the dough as it will grow). If you are baking them on the day then allow the dough to rest for a minimum of 1 hour at room temperature.
Place your heaviest baking tray in the middle of your oven (if you have a baking stone, bully for you – that’s even better!) and preheat the oven to its highest setting. Use fan if you have it.
Shape dough
Cut the dough into ten evenly-sized balls of approximately 80g each. They will be about the size of a mandarin, but will grow to the size of a small orange before you flatten them. Roll each one between your palm and the bench without using any flour – you want to press down on the dough and make circles with your palm. The dough will start to resist the pressure and will form a tight ball. Place each ball on a lightly floured tray, leaving a little space between each one.
Allow to rest, uncovered, for 10-15 minutes. This allows the gluten to rest before rolling out and the dough will start to prove. If the room is very cold you might need to wait a little longer (up to half an hour) but if your oven is on full bore then the room is likely quite warm already.
Dust your workbench with flour and, using a rolling pin, roll out each pita until it is very thin – about 0.5cm thick. Roll one way and then turn and roll the other way to get a nice even shape – don’t worry about using a fair bit of flour during this process also, best to avoid sticking. Try get the pitas about the size of a starter plate.
Bake the pita
Once all your breads are rolled, the ‘fun’ begins. Very carefully place them – as many pitas as will fit (I got 3 or 4) flat onto the hot tray in the oven. If you are more dextrous then you can use a bread paddle or wide spatula: there is a knack to flicking the paddle back so that the pita slides off without losing its shape. This takes practice and patience – I just used my hands and worked quickly. Definitely more dangerous. Once your tray is full quickly shut the door.
Look through the oven’s glass door (if it has one) and watch as the pita breads puff up like pillows. This will take 2-3 minutes. As soon as they’ve puffed up, quickly remove them. They are not supposed to colour much and don’t need turning.
Allow them to cool slightly on a wire rack before stacking, but don’t wait until they’re cold as they dry out quickly. Stack one or two piles and cover them with cling film or put them in a sealed bag – this will help them steam a little and stay really moist.
If you aren’t eating them in the next 12 hours (and I would question that decision) then you should place them in the freezer once cooled.

I actually find the flicking part the easiest!
LikeLike