
Now I get it. I get why so many people baulk at the thought of bread making, deriding it as intensely time consuming and technical. If I wasn’t doing this blog I cannot imagine a scenario where I would be making my own sourdough starter and devoting what has felt like two full weeks to producing something I can buy down the road for $8 (yes, it produces an expensive bread, but only in the scheme of breads. $8 is significantly less than the value I place on around 15 hours of my time).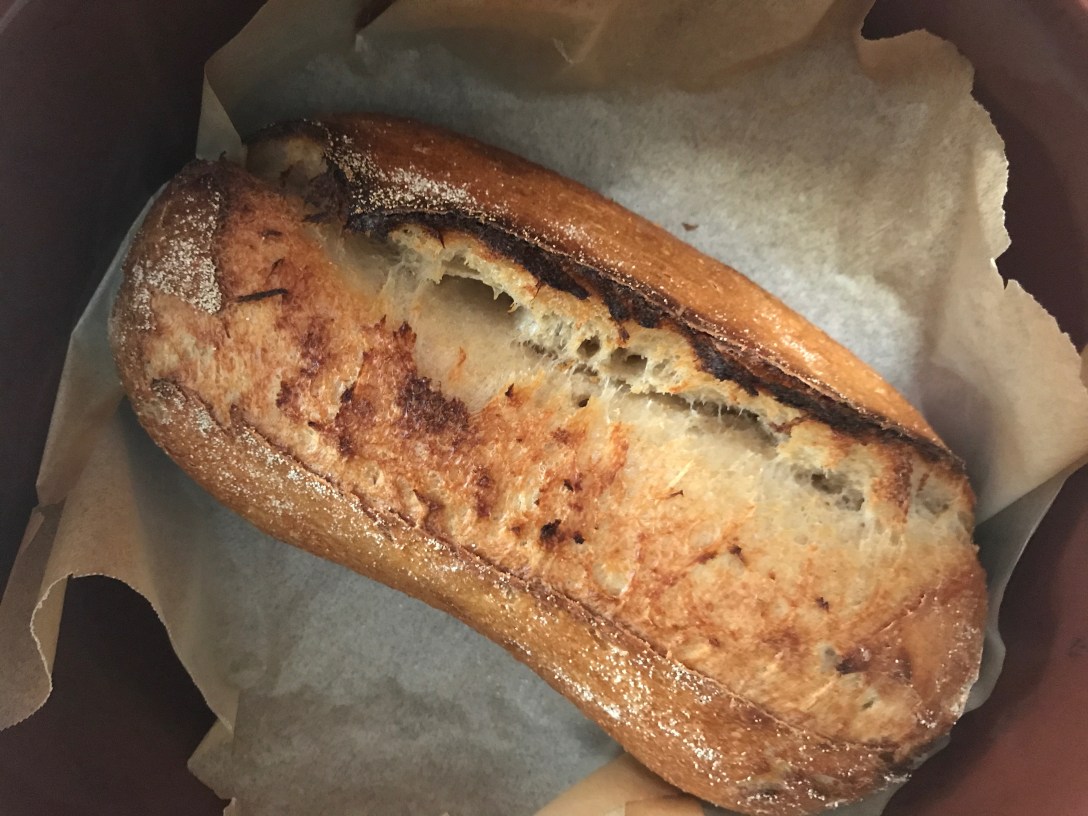
A few weeks ago I committed to my first Proper Bread Book purchase. I went with Tivoli Road Baker by Michael James with Pippa James. I went with this despite receiving a number of other recommendations partly because I found it, and not the others, in a bookstore, and partly because I consider their Olive Sourdough my favourite bread of all time. This is not that recipe.
This is the recipe for the ‘basic’ sourdough, which ‘once mastered’ can be taken in all manner of weird and wonderful directions, including the Olive bread. Given the extremely high likelihood of failure, I figured it would be better to loathe the basic sourdough recipe than to ruin the heavenly Olive loaf. Also, there were loads of olives to be acquired and marinated for that one and I cannot imagine where people find that time, given how mental this process seems anyway.

So, let’s walk through proper breading. This is big leagues stuff, so please make sure you’re sitting down.
First off there’s the starter. I had heard of these mythical things and my loose understanding was that they all came from some ancestral ‘mother’ and were the stuff of family heirlooms and back alley exchanges. Turns out you can make your own through the magic that is flour + water + time. Somehow mixing a tablespoon of water together with a tablespoon of flour in an iterative process for seven days results in natural culture formation. How incredibly sustainable and slow food (and also kind of mind blowing)! What you may not know is that the ideal temperature (according to Michael James) for the water in that equation is 26°C. What you may also not know is that the water that comes out of your tap is not always the same temperature, and certainly not always 26°C. What you may also also not know (but might have guessed) is that taking the temperature of tap water in order to avoid somehow ruining the starter is SO oddly time consuming and incredibly lame. I obviously did it every single time, because ignoring instructions and/or rule breaking of any kind gives me chest pains.


Once the starter is ‘as ready as it will ever be’ you can then look forward to eating your bread within the next 72 hours. In fact you’re only about 12 hours worth of proving and a fortune of specific dough-handling steps away from maybe having a loaf of bread that isn’t disgusting!
I wrote that to be dramatic without checking my numbers, but then I mapped it out as per the below. Turns out ’12 hours worth of proving’ is actually not wrong…
4-6 hours before mixing your dough – build the starter
at least 30 minutes (and up to 8 hours) before mixing your dough – autolyse
Mixing your dough (5 minutes)
40 minutes – first prove
1st turn and fold (2 minutes)
30-40 minutes – rest
2nd turn and fold (2 minutes)
30-40 minutes – rest
3rd turn and fold (2 minutes)
30-40 minutes – rest
4th turn and fold (2 minutes)
2-3 hours – bulk prove
Pre-shape (5 minutes)
25 minutes – rest
Shape (5 minutes)
2 hours/overnight – final prove
Bake


So, actual hands on time: 30 minutes
Time required to get to bake stage: 11 hours (ABSOLUTE MINIMUM) – 24 hours (‘lesiurely’)
You can see how 30 hands on minutes spread out over 11 hours is a real bummer for any other plans you might have. I had a 2.5 hour yoga workshop on the other side of town and I had to enlist Maitland to mix the dough for me. Is this what true love looks like? I then attempted to squeeze in dinner with friends during the 3 hour bulk prove, which culminated in telling them I had to get home ASAP for my pre-shape and that I was both sorry embarrassed. It was a Saturday night.

So let’s recap the potential catastrophe points:
– The starter…7 days of work which could all be undone by water too hot or cold. Also, a chef friend has pointed out a week-old starter is probably too ‘young’ to be any good, so it could fail by virtue of inexperience.
– The autolyse…mixing the water and flour for the dough together ahead of time, so they can get to know each other in a casual setting…I am so befuddled by this step that I don’t even know what to be worried about
– The mixing…mainly I wasn’t here for this so theoretically Maitland could have ruined everything
– The turn and fold…this seemed suspiciously easy for something that the cookbook described in a huge amount of detail. Maybe it was too easy…
– The pre-shape…described in loving detail in the book also and quite possibly a stage where I didn’t achieve the correct taut texture
– The shape…the book describes the dough in relation to rare steak which was quite an unpleasant image. I couldn’t move past that so it’s likely I have major texture failures as a result…
– One of the many proving stages…too short or too long
– The social life impact…pretty much everyone I know has had their plans with me impacted by my attempts to make this one dumb loaf of bread. If this resultant post isn’t sufficiently amusing then I might lose them for good.
– The ‘dutch oven’…ugh where to start. My main issue was that I had to pour water in to assist with the bake and I had no idea whether to pour it underneath the baking paper that the bread was sitting on or on top of it
– The bake itself…MICHAEL JAMES SPECIFIED EVERY GODDAMN STEP OF THIS RECIPE IN ENOUGH DETAIL TO MAKE ME SICK WITH ANXIETY BUT HE COULDN’T DO ME THE SIMPLE FAVOUR OF INDICATING ANY INFORMATION ABOUT THE BAKE TIME. He says the temperature. He says to remove the lid from the dutch oven when there are ‘a few minutes to go’. He does not give any indication of how many minutes will be gone when there are only a few to go. Online is equally confusing. Baking durations ranged from 24 minutes to 1 hour 20 minutes. I ended up using a thermometer and a prayer and splitting the difference around 40 minutes.


The good news is that, after pouring hours of time and tying myself in knots calculating how to fit in my real life around my bread life, I ended up with something pretty delicious. It definitely is a bit denser than ideal and, should I make it again, I’ll try troubleshoot that. But it’s pretty delicious and definitely worthy of a platter, which is lucky because that is its destiny.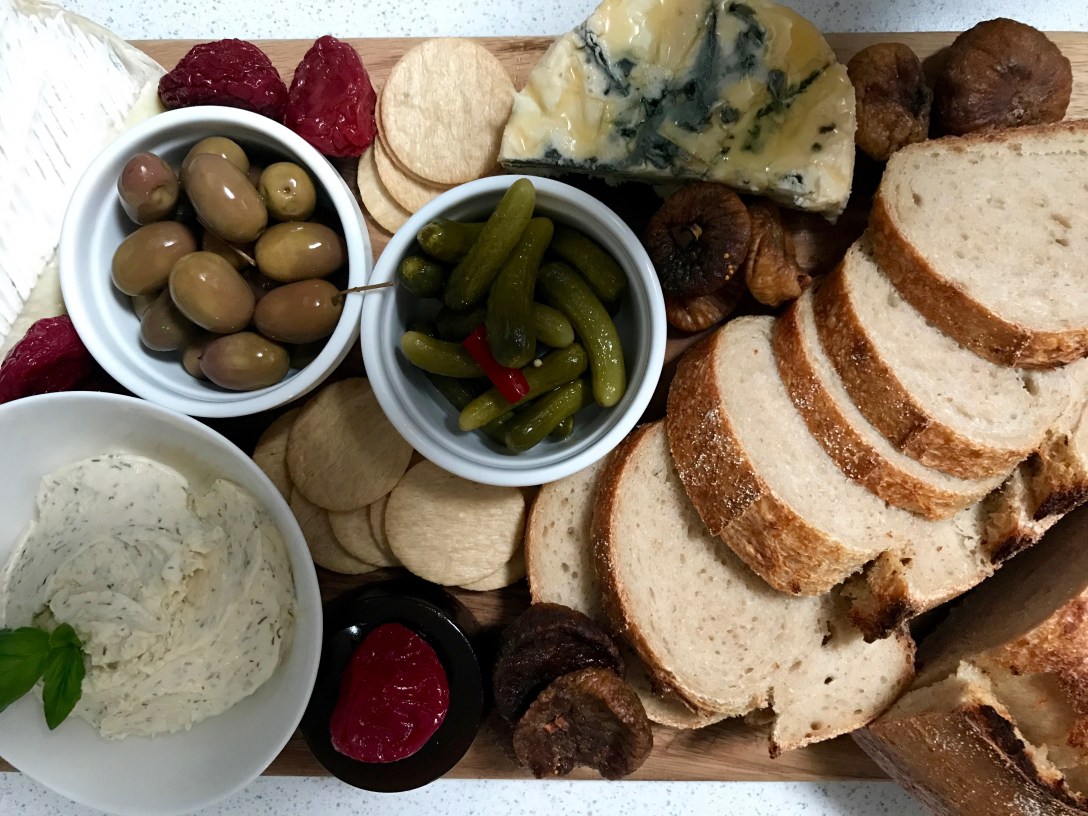
Basic Sourdough
Recipe copied to the word from Michael James’s The Tivoli Road Baker with the exception of the bake time, which I improvised based on the internet and what skerrick of common sense I possess.
Takes: most of your life
Makes: a single loaf
INGREDIENTS
Starter Build
50g starter (see below)
25g bakers flour (high protein bread flour)
25g wholemeal flour
50g water
Dough
90g starter (from the build)
330g bakers flour (high protein bread flour)
90g wholemeal flour
290g water
8g salt
Semolina, for dusting
METHOD
Starter Build – 4-6 hours before mixing your dough
I’ve also seen this step called the Levain. Whatever. You combine all the starter build ingredients together and leave them to get bubbly. You’ll use 90g (out of 150g) for the bread and the rest goes back to maintaining your starter.
Autolyse – at least 30 minutes before mixing your dough
Pronounced auto-leez, FYI. This is where you combine the water and the flours for the dough together in a large mixing bowl. Use your hands to mix well (it’s sticky, but it gets better), and once thoroughly combined cover with a damp cloth and set aside for autolyse stuff to happen.
Build the dough
When your starter is bubbly and you’ve let autolyse-ing go on for long enough you can actually mix your dough. First add 90g of the starter to the flour and water mixture, then squeeze them together while rotating the bowl with your other hand. Do this for a couple of minutes to allow the starter to full incorporate and only then sprinkle the salt over and repeat the squeeze and rotate process to allow that to incorporate. Cover the bowl with a damp cloth and leave for 30-40 minutes.
Turn and fold
This is apparently gentler than kneading for both results and effort, so what’s to argue with? There are four rounds of this with 30-45 minutes between each. Before each round rub your hands with a little oil. Then, in the bowl the dough was mixed in, use one hand to hold the side of the bowl and the other to slide under the dough and fold it over itself. Then, rotate the bowl 90°, slide your hand under the dough that’s now closest to you and fold that over itself. Repeat again, until you’ve done 6-8 folds (it gets tighter and harder to fold). Cover the bowl with a damp cloth and let it rest before repeating.
Bulk prove
After your fourth set of turning and folding it’s time for the bulk prove. For this you just cover the dough, in the bowl, with a damp cloth and leave to prove at room temperature for 2-3 hours. If you want, you can try go to dinner during this window.
Pre-shaping
Once you’ve completed the bulk prove (gotten back from dinner), you can pre-shape. This is less about shaping (apparently) and more about reducing air and building strength in the loaf. To do this, you dust your bench with a little flour (a goldilocks amount that you’ll find through experimentation), dust your hands in a little flour and put the dough on the bench. Pull and stretch the dough out and then fold the edges of the dough over the middle until you have a round-ish shape. Flip the dough over so that the folded edges are underneath. Now, cup your hands around the back of the dough ball and rotate the dough across the bench towards you, using firm pressure as you do to create tension in the dough. Smack out any large bubbles. As you do this you will feel the tension of the dough increase and the ball will become taut and firm. You want a tight round ball of dough that sits up on the bench (not a saggy blob). Leave the dough on the bench covered with a damp tea towl for 15-20 minutes.
Shaping
You can either shape your bread into a round or a batard loaf. I had never heard the word batard loaf before, but that’s the one I did.
Round Loaf
Flip the pre-shaped dough over on the bench (seam side up now). Pull, stretch and fold the edges of the dough over the middle, repeatedly folding up and over the previously pulled and stretched edges about 8 times. It will start to form a tight round ball.
Flip the dough again (seam side down). Then, like in the pre-shape, cup your hands around the back of the dough and rotate it across the bench towards you. As you do this it will catch slightly on the benchtop, stretching the surface of the dough and bulging out ahead of your hand. Don’t let the dough roll over, but push it gently and let it bulge. You’re aiming for a ball of dough that sits tight and high on the bench without sagging and spreading.
Smack out any large bubbles, then close the seams as much as possible by tucking them under with your fingers while moving the dough along the bench. Pinch any seams that reopen back together. Place the dough into a floured proving basket (or bowl) seam-side up and lightly dust the top with semolina.
Batard Loaf
Flip the pre-shaped dough over on the bench (seam side up now). Shape into a wide rectangle with the short edge towards you. Gently flatten and then fold over the top left and right corners to make a ‘triangle’ (more of a trapezoid, for my money). Roll the dough down from the top of the trapezoid, creating tension by rolling tightly and deliberately. Use the heel of your hand to seal the seam at the bottom, knocking out any large air bubbles. Use a dough scraper (or your fingers) to peel the dough off the bench and tidy any seams by pinching them together. Tip the dough into your floured proving basket (either one made for purpose or the lid of an egg carton) seam side up and dust with semolina.
Final Prove
Cover the proving basket with a damp cloth and leave to rise. Either leave it for a few hours at room temperature or chuck it in the fridge. At the end of the rise you are looking for a loaf that has risen by half. To test you can push your finger gently into the dough…when the imprint stays in the dough then you’re good to go. If it springs back immediately then you need to prove for longer, if it deflates quickly then you’ve over-proved. Obviously gutting, but you’re ‘learning’.
The Bake
This is the part I am flying somewhat solo on. I used the Dutch oven method, where I baked the bread in a heavy casserole dish. To do this, preheat the oven, with the casserole dish inside (lid on) to its highest temperature. This will need to happen at least 30 minutes before you intend to bake (it’s very hot.)
Boil your kettle.
Cut a piece of baking paper that’s slightly wider and longer than your loaf and dust it with semolina. Tip your dough out of its proving basket onto the paper (may need a little encouragement to vacate the basket).
Carefully transfer the loaf to the hot casserole dish. If your pan is shallow then slide the paper out, if it’s deep enough then you can leave it.
Score the top of the loaf roughly 2mm deep using a razor blade or sharp knife (or cut it with a pair of scissors). This is to allow the loaf to expand and rise with a little help from the steam you’re about to add.
Pour about 30ml of boiling water around the bread (I went with under the paper, but given you don’t have to leave the paper in it probably doesn’t matter). Be careful because it’s boiling water and a super hot pan.
Put the lid back on and place it immediately in the middle of the oven.
I baked it for 15 minutes, then checked. Then 10 more minutes, then removed the lid and baked for a further 10 minutes. I then took the internal temperature of the bread and it was 93ºC. From what I could tell from the internet you are aiming for closer to 100ºC so I put it in for another 5 minutes. Then I needed to have a shower and get on with my life so I decided it looked good enough and called it a day.
If you’ve made it this far then you deserve a medal and also a slice of homemade bread. Let it cool for a bit and then find out what you have wrought.
Sourdough Starter
Recipe from Michael James’s The Tivoli Road Baker
This is a seven day process which will hopefully result in something you can then look after for the rest of your bread-making life.
You’ll need:
– Wholemeal flour
– A clean jar with at least 330ml capacity (mine was much larger)
– A thermometer to take the temperature of water
Day One
Mix 1 tablespoon of 26°C water with 1 tablespoon of wholegrain flour. Cover and leave in a warm place for 24 hours.
Day Two
There might be a bubble or two when you open the jar (don’t worry if not). There could also be a slightly tangy smell. Add another tablespoon of 26°C water and another tablespoon or wholegrain flour. Stir thoroughly. Cover and leave in a warm place for 24 hours.
Day Three
Again, look out for a few bubbles and some interesting smells. Possibly grassy or sweet tangy or even a little acidic (vinegar-y) – these are good signs. Add another tablespoon of 26°C water and another tablespoon or wholegrain flour. Stir thoroughly. Cover and leave in a warm place for 24 hours.
Day Four
By now there should be more tiny bubbles and full on fermentation taking place. Look out for stronger smells, such as bananas and wheat beer. Add another tablespoon of 26°C water and another tablespoon or wholegrain flour. Stir thoroughly. Cover and leave in a warm place for 24 hours.
Day Five
Look out for lots of tiny bubbles on the surface of your starter and don’t be surprised if there’s quite a strong vinegar-y scent when you first open the lid. This smell will disappear when you feed the starter. Add another tablespoon of 26°C water and another tablespoon or wholegrain flour. Stir thoroughly. Your starter may be ready by now or day 6. Cover and leave in a warm place for 24 hours.
Day Six
The starter should be quite bubbly and active by now with a strong, slightly alcoholic smell of fermentation. It might well be ready to use by now, but if not then add another tablespoon of 26°C water and another tablespoon or wholegrain flour. Stir thoroughly. Cover and leave in a warm place for at least 12 hours.
Day Seven
The starter is now ready to use and should have lots of tiny bubbles on the surface and throughout. If you’re not using it immediately, you can discard all but 1 tablespoon for maintenance. Feed this with (you guessed it) 1 tablespoon of 26°C water and 1 tablespoon or wholegrain flour. Stir to combine.
Maintenance
Now the real work begins. You need to keep feeding this hungry little beast you’ve created or the whole process will have been for nothing.
In general, yeast and bacteria like a clean environment so you need to clean the container and discard all but 1 tablespoon of your starter before feeding it. This should be a weekly process and will keep your starter from growing out of control or from going rancid.
Room Temperature
If you’re going to use your starter regularly (e.g. more than once a week) this is the best storage option. Try not to leave it for more than 7 days between feeds and keep on top of cleaning.
Refridgeration
If you’re more of a casual bread maker then this is a better option. You can store it safely in the fridge for up to a month, but it’s still ideal to refresh it and feed it once a week. Before putting it into the fridge give it a feed of 100% hydration – e.g. if your starter weight is 50g then add 50g water and 50g of flour and mix it through. Leave for 4-6 hours before putting it in the fridge.

I am not going to give this a go…..ever
LikeLike