
Growing up my mother did the bulk of the cooking. My father’s efforts can be summarised as follows: Sunday waffles, Thursday frozen curries, weekend BBQs (meat only, BYO sides) and a year long love affair with making bagels. Bagels have been on my blog hit list for a while, and I thought that this weekend was the perfect time as I could utilise my father’s wisdom.

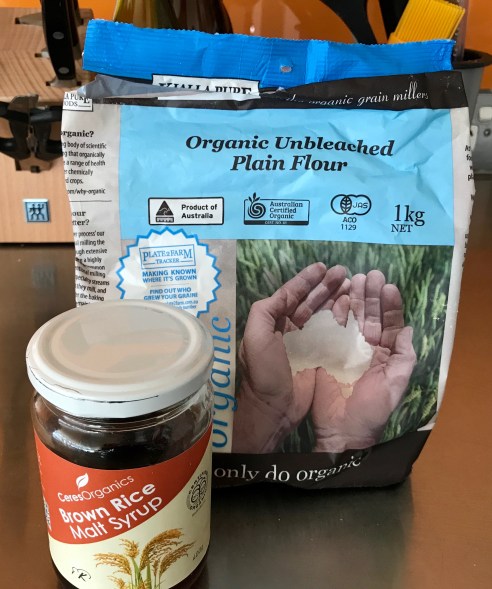
I read a couple of recipes, mainly because the first recipe had two ingredients that alarmed me: malt syrup and EXTREMELY HIGH PROTEIN flour. Like, regular bread flour doesn’t cut it. The second recipe also underlined the importance of both of these, so it was disappointingly clear that there were no short cuts. When I turned to my father (David) to receive his guidance and wisdom on these bagel intricacies it transpired that he could recall neither of these niche ingredients and very little else about his time as a bageller. On my own again.
Another potential problem is that the first recipe I consulted is from a beautiful looking book called Sesame and Spice by Anne Shooter. This is the same book that gave me the challah recipe that failed so spectacularly, nearly ruined Christmas, and kickstarted this blog. I guess it’s a book that has something to prove.
The second recipe I consulted is from the infallible Deb Perelman at Smitten Kitchen, which she points out is a reproduction of Peter Reinhart’s recipe and one that received the stamp of approval from her father as being true to a traditional New York bagel. What I went with, much to my own amazement, is a bit of a hybrid. That’s like a real baker thing to do – combine multiple recipes (two is a multiple) and create YOUR OWN.
Did this adventure actually work? Sort of.

Let’s break it down, starting with those two ridiculous ingredients. The malt syrup was actually easy enough to find, however Deb suggests that honey or brown sugar would work in a pinch. With regards to the stupid flour I ended up settling for a supermarket option that was neither ‘Canadian’ (as Anne advised) nor ordered online (per Deb’s instructions). It was an Australian organic flour that did not call out its high protein content or suitability for bread making, but did have more protein per 100g than the bread flours ranged next to it.
Aside from these oddball ingredients, bagels have a few other quirks. In Deb’s recipe there is a pre-stage with a sponge which you do ahead of the dough itself, it reminds me of some bread recipes I’ve read, and it made me feel tired thinking about it. Instead I copied Anne’s approach where there wasn’t a sponge in sight. The initial prove is short or non-existent (Deb has 20 minutes, Anne cuts straight to the next stage. Once again, I favoured Anne’s hurried approach). You then shape the bagels. I tried to conduct an experiment here by shaping some using the ‘finger poke method’* (roll dough into a ball, stick two fingers through and widen into a hole) and some using the ‘roll and loop method’* (roll the dough into a log and join together into a circle). The ‘roll and loop’ produced much more attractive outcomes.


There is then a long period of hanging out, solidifying, in the fridge (Anne Shooter says 1-3 hours, Deb Perelman advocates overnight). I did take Deb’s advice at this point and conduct a ‘retardation test’ to see if the bagels were ready for refrigeration. Dropping a bagel into a bowl of water to see if it would float was both easy and fun, so why not.

After their refrigeration my grand experiment was deemed pointless – both batches had risen, bubbled and misshapen.

Finally, the bagels are boiled (an aspect both my parents recall clearly). Anne just adds the famous malt syrup to her boiling water, Deb includes the option to add some of that, but insists on baking soda. I chucked both in.

How long do you boil for? Great question. The longer, the chewier. Deb is all for as long as 2 minutes, Anne is more of a 30 second gal. I went with wildly varying times, depending on how distracted I got during the process – usually flipping them after about 20 seconds and removing after another 20.

Then you finally get to bake. The oven is super hot, everyone agrees, but the baking times are another source of contention. Anne advocates 20 minutes, Deb is more of a 10-15. Neither mention whether this should decrease if you’re making smaller ones, or whether a fan function is involved. I found that moving the trays around (per Deb’s instruction) avoided burning, and that the total cooking time was around 15 minutes.
All in all, they turned out pretty well. They were a little flat (I want to blame something that happened in the fridge?), and cutting evenly was basically a nightmare. But that’s not unique to my efforts… 
And they tasted just delicious. David tells me he used to bang his out in an afternoon which makes me both envious and alarmed. He has assured me mine are better.

*method names coined by me
Bagels
Adapted from both Anne Shooter’s Sesame and Spice and Smitten Kitchen
INGREDIENTS
700g Canadian/extra strong/most protein-y bread flour you can find + extra for kneading
2 tsp salt
10g instant yeast
2 tsp caster sugar
425ml warm water
4 tbsp malt extract
1 tbsp baking soda
Toppings – sesame seeds, poppy seeds, whatever you fancy
Semolina for dusting (optional)
Oil for greasing
METHOD
Place the flour, salt, yeast, sugar and water in a bowl with 1 tablespoon of the malt extract. Mix well to form a dough.
Knead the dough on a lightly floured surface. I went for the Dean Brettschneider approach – 15 minutes of kneading punctuated by 1 minute rests every 3 minutes. I added a bit more flour during this process to get a slightly stiffer dough. Definitely knead the dough for at least 10 minutes – you want it nicely smooth and elastic but not too soft.
Split your dough up. 100g pieces for 12 big bagels (these must be huge, my mini ones were still decent sized) or 50g pieces for 24 small ones. Shape them using either of the methods:
“Finger Poke” = roll into a ball and stick two fingers through the centre of create a whole. Roll the dough around your fingers to define and smooth the ring shape.
“Roll and Loop” = roll out the piece of dough into an even log then wrap into a ring and seal the ends together. Deb explains it more and has some advice for dough that’s too elastic.
Place your bagels onto trays lined with baking paper and then cover with lightly oiled clingfilm. Leave to prove somewhere warm for 20 minutes.
Before putting them into the fridge, use the ‘retardation test’. Fill a bowl with water and drop one of your bagels into it. If it floats to the surface in less than 10 seconds you are ready to go. If not, leave to prove for another 10 minutes before re-testing.
Leave your trays in the fridge for at least 3 hours or overnight.
When you’re ready to bake…preheat the oven to 250°C/230°C fan. Bring a large pot of water to the boil, the wider the better. Add the remaining 3 tablespoons of malt extract and the tablespoon of baking soda.
Place refrigerated bagels into the boiling liquid in batches – three or four at a time depending on room in the pan. Bagels should float – if they take a wee while then let them rise to the top before flipping. Otherwise give them about 15-20 seconds on the first side, then flip them to the other side using a slotted spoon. Allow another 15-20 seconds and then remove from the liquid.
Place the boiled bagels onto a rack and sprinkle with the topping of your choice.
Once all the bagels have been boiled, then you can sprinkle semolina over the baking paper on the trays (same baking paper that the bagels sat on for the refrigeration. if you want to use fresh paper then Deb recommends giving this a spritz with oil first to avoid the bagels sticking). Alternatively you can take a leaf out of Anne’s book and skip the semolina altogether.
Place the topped and boiled bagels onto the tray/s and place into the oven. If you are using multiple trays then you will likely need to swap them around between the top and bottom oven racks to ensure even baking. It is also beneficial to rotate the trays 180° after about 5 minutes. Keep an eye on them – baking time for me was around 15 minutes, but based on those recipes it could be anywhere from 10-20. You’re after a nice brown outside and a crispy look. In a good way.
Remove from the oven and try let them cool at least a tiny bit before devouring.
