
Croissants are a bit of a baking holy grail. Not necessarily for me personally (I still aspire to the Tivoli Road olive bread), but by all other accounts. Viennoiserie (a totally snooty name for croissants and other pastries in their flaky family) has a fearsome reputation. It’s immensely time consuming. Super temperature sensitive. Absolutely disinterested in short cuts. In other words: it’s something most sane people avoid.

To add insult to injury, this time-consuming artistry is devalued by the ubiquitousness of croissants and their delectable cousins. My cousin Tali (you may remember her from a Monkey Bread cameo) agreed to face the fearsome croissant with me and, upon learning that the resting time alone totals 8 hours, her boyfriend helpfully observed ‘you can get croissants for like $3 at the supermarket’.

Apparently we place a very low value on our time, because we embarked on a full-day croissanting endeavour that began at 9am and would not end until after 6. Our final croissant yield was 16 (including 2 misshapen offcut ones). Based on a $3 market price that puts our most optimistic financial upside for the day at $48. That’s $24 each for Tali and me. Or $2.67 an hour. And that’s before subtracting the cost of raw materials – the cultured butter alone cost $9 (if you think you can skimp on buying cultured butter then think again. These puppies are 25% butter so everyone can taste your cost-cutting)! That’s three croissants! If you’re looking to make great cash, don’t start up a homemade croissant business that produces only 16 croissants in a day, unless you are happy with an hourly wage around the $2.17 mark.

Financial measures aside, the croissants were a great success. I would even go so far as to say that they aren’t actually ‘hard’, just a little bit fiddly and immensely time consuming. There is a lot of repetition, especially as you ‘laminate’ the dough. This involves encasing a slab of chilled butter inside a slab of chilled pastry, then rolling it out and folding it over before refrigerating it and repeating the process. Three times.
I am a little concerned that the pastry world has misunderstood the mathematics of croissants and perhaps hasn’t realised that $2.17 an hour is neither a good wage nor a legal one. The main reason I’m worried about this is that I’ve detected some other bad number-work…Michael James of Tivoli Road Bakery is clearly an excellent baker (see: every single time I wax lyrical about the olive loaf), but has a couple of instances of dubious numeracy.
Issue one: Michael James instructs you to roll your softened butter (BUT NOT TOO SOFT, IS IT MORE THAN 18°C? PUT IT BACK IN THE FRIDGE IMMEDIATELY YOU CARELESS BUFFOON) out to a rectangle 13cm x 16cm. You then place it in the centre of dough that is rolled 40cm x 20cm. However, when illustrating this in his helpful picture guide, Michael James shows a slab of butter that is clearly closer to 13cm x 20cm, as it reaches the top and bottom edges of the short side of the pastry. I smell a rat. Either he is mis-measuring and being a slapdash mathematician, or he is deliberately misleading me in order to make me fail (please note that I require no assistance here).
Issue two: the above butter issue is easy to completely ignore, regardless of any malicious intent. My slab of butter was actually a square of about 15×15 and everything turned out just fine.
This next piece of bad maths just irritates me. Michael James tells his croissant makers to roll their ready dough out for cutting. At this point you have spent about 6 hours preparing dough for this very moment, so you are tired but also excited. He instructs you to roll a rectangle 20cm x 55cm. Specific, right? Not specific enough, in my opinion. The next instruction is to make notches along the long edges of the dough. Down one edge you make a notch every 8cm. Down the other edge you make the first notch 4cm along and then notches every 8cm. Can you see the problem? 55 is not divisible by either 4 or 8. 56 is. If you are going to be a pedant and cut your croissants meticulously using this notch method (can you tell that we abandoned it?) then you might as well roll it out the extra cm.
While we are on the subject of numbers, here are some others to daunt you. The dough spends 6 and a half hours in the fridge. That time is split most inconveniently as: one hour / three hours (or overnight) / thirty minutes / thirty minutes / one hour / thirty minutes. It then spends another 1-2 hours rising. So what did we do while the dough was chilling (and also when it was rising)? Tali went to gym. I did a yoga. We watched videos on how to laminate dough, including this industrial one where margarine (yuck) is used instead of butter. Tali did work. I wrote my Italian bread blog. We read other cookbooks, including the second Honey one which is full of new and exciting yeasty things that I am totally going to attempt.
If you’re still not daunted then go ahead. Give croissanting a go. If you have nowhere else to be all day, find baking enjoyable enough to offset the bad balance sheet situation and are happy to fit your life in around dough refrigeration then you might find viennoiserie is your jam. For me, I would say it’s probably eclipsed the doughnuts and sourdough for being the most impressive and surprisingly successful result of this blog. I have to confess I’ve found myself thinking about making them or other la-di-da Viennoiserie pastry delights again in the near future…truly terrifying.

Croissants
All adapted (very slightly) from the Tivoli Road Baker by Michael James with Pippa James.
Firstly, the Croissant Pastry (this can be used for other Viennoiserie instead, but you’ll have to find someone else to give you a recipe for Danishes and Pain au Chocolat.)
Croissant Pastry
INGREDIENTS
600g strong bakers flour (you can use 50g spelt flour and 550g bakers flour instead if you want to be more like Michael James)
60g soft brown sugar
14g salt
175g water, wrist temperature
175g full-cream milk at room temperature
18g fresh yeast
250g unsalted butter, chilled, 82% fat and preferably cultured (I used 225g. It was fine)
METHOD
Prepare the dough
In the bowl of an electric mixer fitted with the paddle attachment, combine the flour(s), sugar and salt. Mix briefly to combine. Add the water, milk and yeast. Mix on a low speed for 10 minutes – the dough should be smooth and elastic and coming away from the bowl.
Turn dough out onto a lightly floured surface and knead gentle for a couple of minutes. Shape into a rectangular block approximately 4cm thick and then wrap in plastic wrap (or place in a container) and refrigerate for an hour.
Take the dough out of the fridge and turn out onto a lightly floured bench. Roll the dough into a rectangle roughly 20 x 40cm, with the long edge closest to you.
Fold the left hand third of the dough into the middle, then fold the other third on top – it’s like you’re folding a letter. Put the dough back into the plastic wrap or contained and refrigerate for at least 3 hours. If you want to split the work across two days then you can stop here for day one and pick up again tomorrow. If you want to do it all in one day because you’re a masochist like me then take your butter out (see below) now.
Prepare the butter
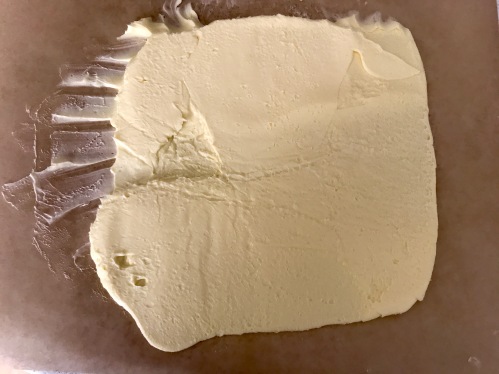
Remove your 82% fat content butter from the fridge and leave to soften at room temperature for 30-60 minutes. You want it malleable but not too oozy. Place butter in between two sheets of baking paper and roll it out into a rectangle about 13 x 16cm (see my notes above for how desperately important I consider those measurements – approximate is fine. Just don’t let the long side get more than 19cm). Butter should be about 1cm thick. Wrap it up in more plastic wrap (you’re really getting your money’s worth out of that stuff in this recipe) and refrigerate for at least 2 hours.
Laminate the pastry
Get that butter out of the fridge again and let it soften for 30-60 minutes. Again, you want it malleable but not so much so that it’s going to ooze everywhere and ruin your hard work. If you want to get very serious then check the temperature – it should be between 14 and 18°C.
Take your dough out of the fridge and place on a lightly floured surface. Roll into a rectangle 20 x 30cm with the long edge towards you.
Place your slab of butter in the centre of the rectangle so that the short edge of the butter block is towards you (and the long edge should be close in length to the short edge of the pastry).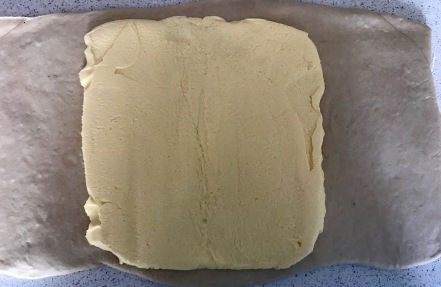
Fold the sides of your pastry over the butter block so that it is completely cocooned in pastry. 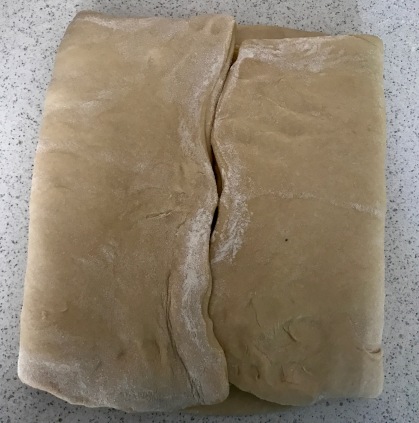 Gently press down on the pastry to ensure the cocooning is comprehensive and then roll the pastry vertically (i.e. with the seam where the pasty joins running up the middle and getting longer as you roll) until you have a rectangle of even thickness, approximately 45cm long by 20cm wide. Do this carefully as the butter is at its most willing to ooze right now. This guy has a technique where he sort of bounces the rolling pin along the pastry to press the butter along before he rolls. Once we watched this we adopted it. If your butter is misbehaving and it feels too hard then walk away for 10 minutes to let it soften. If your butter is misbehaving and it feels too soft then back into the fridge it goes for 10 minutes.
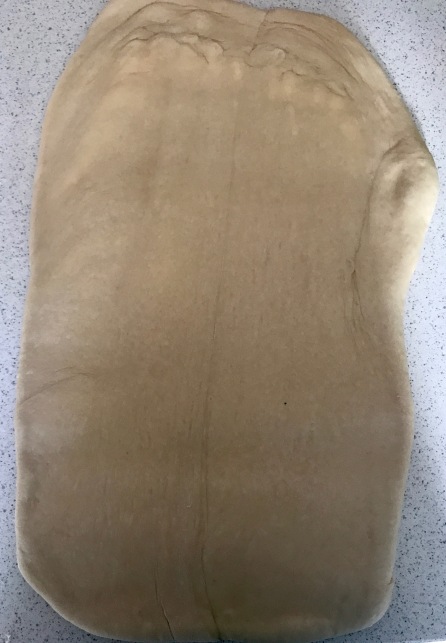
Neaten the rectangle if you want. (Michael suggests trimming the ends and using these as a ferment for your next batch, a step so hardcore I left it out of my recipe write up altogether. You do you though. Add 60g of ferment to the dough with the wet ingredients next time if you’re someone who will do this more than once.) Then fold the top third of the rectangle into the centre and then cover with the bottom third – another letter fold. Congratulations, you’ve just done a single fold! Only two more to go. Put the pastry block back in the fridge, wrapped well in plastic wrap. Leave for 20-30 minutes.
Remove the pastry from the fridge and prepare for the second fold. Once again roll the pastry out to 45 x 20. In doing this ensure that the ‘spine’ of your letter is on the left hand side (this to make sure you are rotating as you go and helps with even lamination). Do another letter fold and return to the fridge, wrapped well in plastic wrap. Leave for 20-30 minutes.
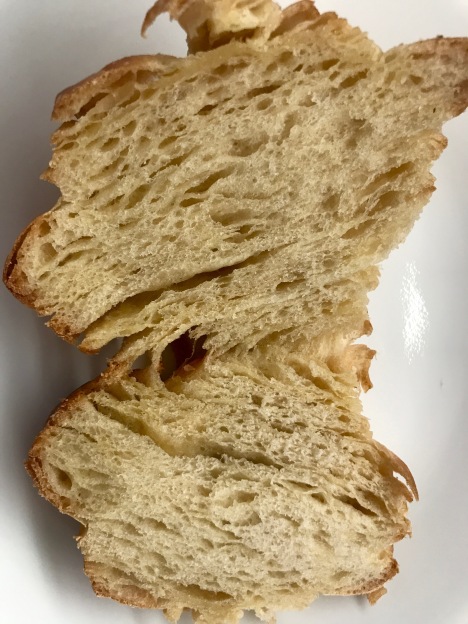
Remove the pastry from the fridge and prepare for the third and final fold. Repeat the rolling and folding, again ensuring the spine is on the left hand side. After this fold is complete return to the fridge for at least an hour. If you were to cut the dough in two right now you should be able to see all the beautiful layers of lamination – the proof is going to come in cutting your croissant shapes very soon.
Croissants proper
INGREDIENTS
1 quantity of that croissant pastry you just made
1 egg
50g full-fat milk
pinch of salt
METHOD
Shape your pastries
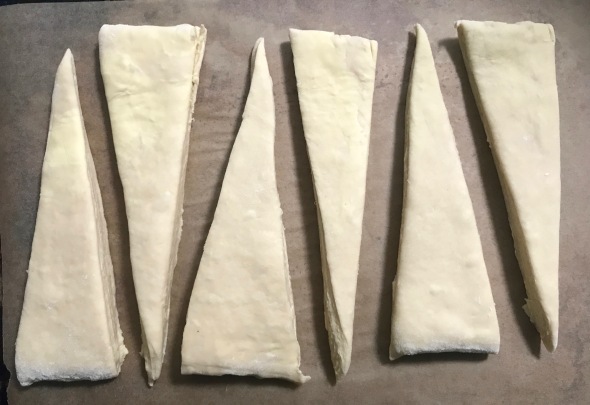
Remove your dough from the fridge, place on a floured surface and roll out into a rectangle 20 x 56cm (the 56 is if you are very keen on maths. If you aren’t and are ok to wing it, then being approximate is all good).
Trim your rectangle if needed and then, if you’re into the notch method, make them as follows: every 8cm along the bottom edge of the dough (long side). 4cm along the top edge of the dough and then every 8cm after that.
Cut triangles out of the dough by placing a ruler along the dough between the first notch on the top (4cm along) and the corner at the bottom. Cut along that edge and then keep the ruler at the top notch (the one 4cm along) and move the other end of it to the first notch on the bottom. Cut along that and you should have a triangle with a base of 8cm. You then proceed in a zigzag pattern, cutting triangles and minimising waste. If you are finding this too fiddly then you can eyeball it, that’s what we ended up doing.
Place your triangles flat in a container or tray and cover loosely with plastic wrap. Refrigerate for 30 minutes.
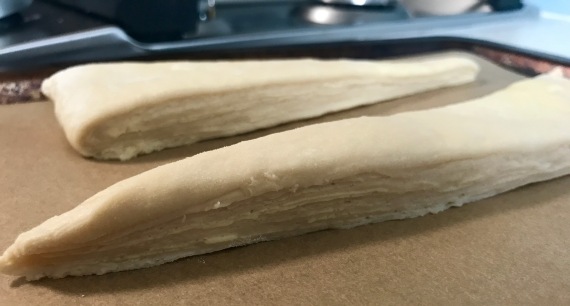
Line two trays with baking paper. Remove triangles from the fridge and start rolling. To do this, take a triangle and elongate it slightly. Roll from the base of the triangle towards the tip, gently pressing as you go and ensuring the tip is pressed into the bottom of the pastry when the whole thing is rolled up (if it’s not sticking then dab a bit of water to help it along).
Place rolled dough onto the lined trays, leaving a bit of a space. If you are making the full 8cm base size ones then you will get about 5 to a tray.
The Prove
Lightly cover the trays with plastic wrap and leave them in a warm place to rise. You want them to rise by half and this will take 1-2 hours. Check if the dough is ready by lightly pressing it – if it leaves a dent then it’s time to bake. If the dough springs back then it needs some more time proving.
Baking!
Preheat your oven to 190°C fan (I tried this as just bake initially and that was too low – I think 210°C might work as a non-fan option, but cannot confirm that for sure).
Make an eggwash by lightly beating together the egg, milk and salt (the salt helps denature the egg proteins and delivers a runnier, better wash). Brush the surface of each of your croissants with egg wash.
Place the first tray in the middle shelf of the heated oven and reduce the temperature to 170°C fan. Bake for 10 minutes and then check – turn the tray if needed – and bake for a further 4-5 minutes or until they are golden and flaky. Even with the fan adjustment I still found ours took closer to 20 all up.
Repeat with the second tray (turning the temperature up again first).
Cool croissants slightly on the trays and then enjoy the fruits of your labour. So much more satisfying than buying one for $3, right?

One thought on “Task 27: Croissants”